Sunday, March 3, 2013

Butternut Squash Pizza with Rosemary

I have a certain weakness for dough.  Pretty much any kind of dough.  I try to stay away from dishes that call for it because I know I'll overindulge.  However, that doesn't mean I stay away from these meals/items completely. After all, what good is living if you can't enjoy once in a while? Hence, I caved and made the following dish - using another of my favorite ingredients ever (which is NOT unhealthy!) - butternut squash.

I picked up the original recipe here from allrecipes.com.

BUTTERNUT SQUASH PIZZA with ROSEMARY


INGREDIENTS

1 cup thinly sliced onion
1/2 butternut squash - peeled, seeded, and thinly sliced
1 teaspoon chopped fresh rosemary
salt and black pepper to taste
3 tablespoons olive oil, divided
1 (16 ounce) package refrigerated pizza crust dough, divided
1 tablespoon cornmeal
2 tablespoons grated Asiago or Parmesan cheese

*I also added 1-2 oz crumled blue cheese once it came out of the oven to give it more "kick". 


DIRECTIONS

Preheat oven to 400 degrees F (205 degrees C). Place sliced onion and squash in a roasting pan. Sprinkle with rosemary, salt, pepper, and 2 tablespoons of the olive oil; toss to coat.

Bake in the preheated oven for 20 minutes, or until onions are lightly browned and squash is tender; set aside.

Increase oven temperature to 450 degrees F (230 degrees C). On a floured surface, roll each ball of dough into an 8 inch round. Place the rounds on a baking sheet sprinkled with cornmeal (you may need 2 baking sheets depending on their size). Distribute squash mixture over the two rounds and continue baking for 10 minutes, checking occasionally, or until the crust is firm. Sprinkle with cheese and remaining tablespoon olive oil. Cut into quarters, and serve.


PERSONAL NOTES:

Using the pre-made pizza dough was the right way to go.  It really cut down on prep time.  I stand by what I said earlier; it's dangerous for me to keep it in the house.  I end up wanting to use it all the time (and thus be eating it all the time!). So far, this has been used well within reason.  No overindulgences.  And while I really did enjoy the overall flavor of the pizza, I probably wouldn't make it all that often - in an effort to keep away from the breads. At least a little bit.

Oh, I should also mention you may want to sprinkle an ounce or two of crumbled blue cheese on top of the pizza to give it a little more kick. I felt it really needed it. I was glad I did that!

Sunday, February 24, 2013

Chocolate Truffle Tart

Oh my yes, this is for real. Chocolate Truffle Tart.  Not only do I like to experiment with a new entree dish each week, but I also like to try out new desserts.  This was out-of-this-world good.  The only downside to this is the high calorie count.  I don't exactly know what it is, but based on the ingredients that went into it, it's not low-cal, reduced fat.  Oh no.

Still, I'm glad I found it.  Original recipe can be found here on Dash Recipes.

CHOCOLATE TRUFFLE TART


INGREDIENTS:

For Crust:
28 chocolate wafers finely ground in a food processor (about 1 cup)
6 Tbsp unsalted butter, melted and cooled completely


For Filling:
1/2 lb fine-quality bittersweet chocolate (no more than 60% cacao), coarsely chopped
6 Tbsp unsalted butter, cut into 1/2-inch cubes
2 large eggs, lightly beaten
1/3 cup heavy cream
1/4 cup granulated sugar
1/4 tsp salt
1 tsp pure vanilla extract


DIRECTIONS:

MAKE CRUST:

Put oven rack in middle position and preheat oven to 350°F. Wrap a sheet of foil over bottom of springform pan (in case of leaks). Lightly butter side of pan.

Stir together ground wafers and melted butter in a bowl until combined, then pat mixture evenly onto bottom of pan and 1‚ inches up side. Bake until crust is slightly puffed, about 10 minutes, then cool completely in pan on a rack, about 15 minutes. Leave oven on.


MAKE FILLING WHILE CRUST COOLS:

Melt chocolate and cubes of butter in a 2-quart heavy saucepan over low heat, stirring until smooth, then remove from heat and cool 5 minutes.

Whisk together eggs, cream, sugar, salt, and vanilla in a bowl. Whisk chocolate mixture into egg mixture until combined well.

ASSEMBLE AND BAKE TART:

Pour filling into cooled crust and rap pan once on counter to eliminate any air bubbles. Bake until filling 1 inch from edge is set and slightly puffed but center trembles slightly when pan is gently shaken, 20 to 25 minutes. (Center will continue to set as it cools.)

Cool tart completely in pan on a rack, about 2 hours. Chill, uncovered, until center is firm, about 4 hours. Remove side of pan and sprinkle with cocoa to serve.

PERSONAL NOTES:

I didn't have bittersweet chocolate and surprisingly I couldn't find any.  I used a couple squares of semi-sweet chocolate I had in the cupboard as well as some dark Venezuelan chocolate I had leftover from making chocolate truffles recently (also ridiculously good). I was afraid it wouldn't come out right, but believe me when I say this was PERFECT! I was really making this for my husband, the raging chocoholic, but I ended up loving this as well.  It's kinda labor intensive but nothing outrageous.   It's something I would certainly consider making for company.

Oh, and I didn't used cocoa powder on top, as you can see by the pictures I used powdered sugar.  Just divine.

Saturday, February 23, 2013

Ricotta Gnocchi with Browned Butter Garlic Sauce

I've been pinning a serious amount of food items on Pinterest. At least once a week I've been trying out a new recipe (or seven).

Today while my hubby was in the city with family visiting the Museum of Natural History, I decided I had time to try out something new.  Hence, today's dish ricotta gnocchi with browned butter garlic sauce.

My take on it quite simply, is it's pretty good.  I feel like I might add something to it next time to spice it up a little, but overall I was pleased with the results.

You can find the original recipe on Collecting Memories.

RICOTTA GNOCCHI WITH BROWNED BUTTER GARLIC SAUCE


INGREDIENTS:

9oz Ricotta
1 egg yol
k 
1/4 to 1/2 tsp fine sea salt
2 tbsp Parmigiano, freshly grated, extra for sprinkling
1/4 cup all-purpose flour, extra for dusting the dough/board


DIRECTIONS:

Add Ricotta cheese, egg yolk, salt and freshly grated Parmigiano into a large bowl. Mix well with a spoon. Add the flour and stir in briefly, just until combined – the dough will still be sticky.

Generously flour a board, take a big tablespoon of the dough and scoop it onto the board. Dust with flour, before rolling it into a finger-thick roll. Cut it into little pillows.

Meanwhile bring a large pot of water to a boil, add a pinch of salt and reduce heat until the water bubbles lightly. Add the gnocchi and stir once, so they don’t stick to the bottom – then let cook until they start floating on top. Depending on their size this may take 2 to 4 minutes. Take out with a skimmer.

If you want to brown your gnocchi to make them crispy outside, place them in a non-stick pan (no oil needed) and let them brown nicely on both sides. Don't move them around too much. Once done, arrange them on a plate and drizzle the sauce over.

PERSONAL NOTES:

The gnocchi was super easy to put together. It boiled up fast too.  My only real complaint with the dish is that once the gnocchi were in the pan crisping up, it took a long time.  I mean, longer than the rest of the prep and cook time.  That's a little silly to me.

The only other thing I might want to add is more flavor.  It doesn't have a very distinct taste.  Ricotta is pretty neutral.  I would either bam up this dish with a spice weasel or add another ingredient.  Like maybe another kind of strong flavored cheese - even if to only sprinkle on top.

But as I mentioned above, I'd make this dish again for sure.  It was good.

Thursday, February 14, 2013

Roasted Brussels Sprouts with Balsamic Glaze

Happy Valentine's Day!

Instead of going out today, I chose to cook up a nice dinner for my hubby.  Luckily I was free most of the day so I had the time to do this.

Until I have more time to post the entire dinner, I'm going to post a side dish: Roasted Brussels Sprouts with Balsamic Glaze.

Not too long ago I had lunch with a friend of mine at Red Rooster in Harlem. Needless to say it was outstanding. Chef Marcus Samuelsson truly outdid himself. I was surprised when my lunch arrived and with it was a handful of roasted brussels sprouts.  Despite my 20-year vegetarian/pescatarianism, I was always turned off by brussels sprouts. It reminded me too much of the way my mom cooked them all those years ago.  Sorry Mom, boiled vegetables just don't cut it. I'm so glad I rediscovered most of the veggies I eat today.  Brussels sprouts is now among them.  What a total revelation.

I like roasted vegetables so I thought I'd give it a whirl with these guys.  And by the way, I didn't realize how expensive brussels sprouts were.  A small container cost me $3.99.  Ouch!  Happily, they came out great and both me and my husband enjoyed.

ROASTED BRUSSELS SPROUTS WITH BALSAMIC GLAZE


INGREDIENTS

Brussels sprouts
2 TBSP Olive Oil
Salt & Pepper to taste

For the glaze:

16oz Balsamic Vinegar
1/2 Cup Brown Sugar

DIRECTIONS:

Preheat oven to 350 degrees.

Slice each sprout in half. Place them in a medium bowl and drizzle on the olive oil, salt and pepper. Give them a good toss so all sprouts are covered.

Using a greased cookie sheet (I used foil sprayed with Pam), spoon the sprouts onto the cookie sheet and

Place in the oven for 20-25 minutes or until edges begin browning.

For the glaze... Using a medium saucepan, dissolve the sugar completely into the vinegar. Bring to a  boil - stirring constantly - then reduce heat to a simmer for about 25 minutes. Liquid should reduce to about half.  You'll know it's done when a spoon comes out coated.

By the way, the glaze can be used for many different dishes.  Chances are you'll have plenty leftover (I know I did) so you can use it again for meat, fish or other side dishes.

Enjoy!!!


Sunday, February 3, 2013

Hot Cocoa Souffle

Superbowl Sunday is here.  An interesting game, if you're interested.  Since the Giants aren't in this year I'm not too invested either way.  Actually, I spent more time watching Puppy Bowl on Animal Planet than I did on the big game.

Although my hubby and I had no plans to host a game-party, I still felt compelled to make something fun and new.  And yes, I used the Superbowl as an excuse (albeit a flimsy one :)

Today's delectable dish: Hot Cocoa Souffle.  I found the original recipe here on www.recipe.com

Continue on for the recipe and further on for the end results...

HOT COCOA SOUFFLE


INGREDIENTS:

Butter

3  tablespoons sugar

2  tablespoons unsweetened Dutch-process cocoa powder

1/4  cup  utter

1/2 cup sugar

1/2 cup unsweetened Dutch-process cocoa powder

1/4 cup all-purpose flour

1 cup Milk

4 egg yolks, lightly beaten

4 egg whites


2 tablespoons sugar


DIRECTIONS:


Preheat oven to 350 degrees F. Butter the sides of a 1-1/2-quart souffle dish or oven going mixing bowl. In a small bowl, stir together the 3 tablespoons sugar and the 2 tablespoons cocoa powder. Sprinkle the inside of the buttered dish with enough of the sugar/cocoa mixture to coat bottom and sides; set dish and remaining sugar/cocoa mixture aside.
In a medium saucepan, melt 1/4 cup butter over medium heat. Stir in the 1/2 cup sugar, 1/2 cup cocoa powder, and flour. Add milk all at once. Cook and stir until thickened and bubbly. Remove from heat. Place egg yolks in a large bowl. Gradually stir chocolate mixture into beaten egg yolks. Set aside.
In a large bowl, beat egg whites with an electric mixer on medium to high speed until soft peaks form (tips curl). Gradually add the 2 tablespoons sugar, beating until stiff peaks form (tips stand straight) and the sugar is completely dissolved. Fold 1 cup of the beaten egg whites into chocolate mixture. Fold chocolate mixture into remaining beaten egg whites. Transfer mixture to prepared dish.
Bake for 40 to 45 minutes or until a knife inserted near the center comes out clean. Immediately sprinkle top of baked souffle with remaining sugar/cocoa mixture. Serve with scoops of coffee ice cream or if desired, place scoops of ice cream in center of souffle and serve. Makes 6 to 8 servings.


PERSONAL NOTES:

This came out pretty well. My hubby and I enjoyed them, but didn't LOVE them. We both kinda felt like they were missing something. They needed to be a little bit richer or something.  Although I have to say they did taste very convincingly "hot cocoa"-ish.

I've made souffles before and had a fair amount of success. As long as you follow the directions you should be fine.

Important Note:  When combining the chocolate mixture with the egg yolks be sure the mixture has cooled enough. You add hot chocolate mixture with egg yolks you'll be left with scrambled eggs. Don't make this mistake!!!

The recipe didn't specify what kind of milk to use. Since I don't keep anything other than skim milk in the house that's what I used.  Therefore, each serving came to about 260 calories. NICE!!!

Thursday, January 31, 2013

Sweet Potato Spinach Pesto Lasagna Rolls

Time for another new dish!  It's been my goal to try out a new one every week. And I'm trying to make them more healthy (if they're not already). This recipe wasn't too "diet-friendly" to start with, but I made some changes to it to lighten it up and remove some of the guilt...

It's no secret I LOVE all things pumpkin and winter squash so naturally I gravitated toward it.  Luckily for me I have a couple afternoons free and I had the time to do it.  Unfortunately, I'd have to say if I only had nights to make dinner - like cooking after a long day of work, I'm not sure I'd have the energy or desire to make this.  Even still, it took me a long time to make.  Based on that I'm not sure I'd make it again. Unless I found a way to shorten up the prep time... we'll have to see.

I found the original recipe here.

SWEET POTATO SPINACH PESTO LASAGNA ROLLS


INGREDIENTS

5 cloves garlic
5 oz basil, leaves torn off
2 tbsp pine nuts
2 tbsp olive oil
2 oz spinach
15 oz part-skim ricotta
6 oz mozzarella, grated, divided
1/3 cup parmesan cheese
4 medium sweet potatoes
12 lasagna sheets
2 cups tomato basil sauce
salt and black pepper, to taste

DIRECTIONS

Preheat oven to 350 and set a pot of salted water to boil.  In the meantime, combine the garlic, basil, pine nuts, olive oil, and spinach in a food processor and blend until smooth.  Add salt to taste.

In a large bowl, mix together the ricotta, half of the mozzarella, parmesan cheese, and pesto that you just made.

Poke sweet potatoes all over with a fork.  Wrap each in a damp paper towel and microwave on high for 2 minutes per side or until fork-tender.  Remove from microwave.  When cool enough to touch, remove the skin and mash the sweet potato flesh in with the ricotta-pesto mix.  To make it REALLY smooth, food process it until totally blended.  Season to taste with salt and black pepper.

When water comes to a boil, add the lasagna noodles.  Cook until just al dente.  Line two large baking sheets with wax paper.  Using a pair of tongs, remove the noodles from the cooking water one by one and place them next to each other on the cookie sheets.

Spread 2-3 tbsp of sweet potato-ricotta filling on each noodle. Beginning at one end, loosely roll each sheet.  Spread 3/4 cup of the tomato sauce onto the bottom of a 9x13-inch baking pan.  Place the rolls, seam side down, into the baking pan, fitting them as snugly against each other as possible.  Top with the remaining tomato sauce and mozzarella.

Cover pan with aluminum foil and bake for 30 minutes.  Remove foil and bake for 15 minutes or until cheese starts to brown.  Let cool for about 5 minutes before serving.


PERSONAL NOTES:

I substituted: 1 cup 1% cottage cheese and 1 cup part-skim ricotta for the full 15oz container of ricotta.  Lightened it up a bit.

Also, instead of the 2 tablespoons olive oil, I used 2 tablespoons Olivio spread (melted). It was 140 calories instead of the full 240 calories of the OO.

Finally, I used fat free mozzarella instead of the part-skim version.

Ultimately, it tasted fine but again...took too long. Oh, and next time I would increase the sweet potatoes just a little. When I followed the original recipe I couldn't detect the sweet potatoes AT ALL.

Good luck :)

Thursday, January 24, 2013

Buttery Cream Cheese Coffee Cake

To be perfectly honest, I didn't have too much success with this one. Well...it looks like I did but I wasn't all that pleased with the results.

Not a great way to begin a new post for a new dish, is it? Then again, part of the idea with this blog is to post the dishes I make and talk a little about it. Truthfully, if it's rubbish I wouldn't bother posting, but I feel like this cake has potential.

The pictures on the original post where I got the recipe from made my mouth water. I was looking for something new to bake and so decided to try this one. I really wanted to like it, but I just didn't. It feels like it's missing something but I can't put my finger on it.

If you want to give it a whirl, here it is...

BUTTERY CREAM CHEESE COFFEE CAKE


INGREDIENTS:

CAKE

1 cup butter (no substitutes)
1 cup caster sugar (I used granulated)
2 eggs
1/4 cup sour cream 
2 cups flour
2 teaspoons baking powder
1/2 teaspoon salt

FILLING

2 (8 oz) packages cream cheese, softened
1 egg yolk
1 cup granulated sugar
1 teaspoon vanilla

TOPPING

1/3 cup light brown sugar
1/3 cup flour
1/4 cup butter


DIRECTIONS:

Set oven to 350F with oven rack set to second-lowest position. Grease a 13 x 9-inch (or an 11 x 7-inch, baking time will need to be increased slightly). Cream butter with sugar (about 3-4 minutes), add in eggs and sour cream; beat well (about another 3 minutes). In a bowl, sift together flour, baking powder and salt.Add the flour mixture to the creamed mixture; beat well until combined (batter will be thick). Spread more than half of the batter in the prepared baking pan. In another bowl, cream together all filling ingredients, then carefully spread over the cake batter. Spoon the remaining cake batter over the top of the cheese mixture. Mix all topping ingredients, pinching together with fingers until the consistency is like crumbs, and sprinkle over the top. Bake for about 50-55 minutes or until middle feels set and not jiggly.

PERSONAL NOTES:

Suggestion: ADD 1 tsp cinnamon for the topping. I really felt the topping should have had that flavor running through it. What kind of coffee cake doesn't have cinnamon in a crumb topping? Right? Oh... I increased the amount of light brown sugar and decreased the flour in the topping. The consistency needed to be better. That ought to do it.

You know, given the changes I suggested, I might be willing to give this one another try... hmmm...

Tuesday, January 22, 2013

Spinach cake or souffle?

I found this recipe in an email sent to me by Eating Well Magazine.  It looked like a good, fairly easy recipe. I decided to give it a whirl.  The end result: a yummy spinach treat!  However, I can't determine whether or not Spinach Cake is the right name for this. It's closer to a souffle.

Then of course the original recipe called for making the "cakes" in a muffin pan.  I can't even imagine doing that. I think you'd end up with really SMALL portions. So I decided to make them in ramekins. This left two portions - sizeable I thought - while still being pretty low in calories and fat. Sweet.

PARMESAN SPINACH SOUFFLES


INGREDIENTS


  • 12 ounces fresh spinach, (see Note)
  • 1/2 cup part-skim ricotta cheese, or low-fat cottage cheese
  • 1/2 cup finely shredded Parmesan cheese, plus more for garnish
  • 2 large eggs, beaten
  • 1 clove garlic, minced
  • 1/4 teaspoon salt
  • 1/4 teaspoon freshly ground pepper


DIRECTIONS

Preheat oven to 400°F.

Pulse spinach in three batches in a food processor until finely chopped. Transfer to a medium bowl. Add ricotta (or cottage cheese), Parmesan, eggs, garlic, salt and pepper; stir to combine.

Coat two ramekins with either butter or Pam spray.

Bake the spinach cakes until set, about 23-26 minutes  (you may want to check them with a toothpick to see if it comes out clean). Let stand in the pan for 5 minutes. Loosen the edges with a knife. Serve warm, sprinkled with more Parmesan, if desired.


  • Note: Baby spinach is immature or young spinach—it's harvested earlier than large-leaved mature spinach. We like the sturdy texture of mature spinach in cooked dishes and serve tender, mild-flavored baby spinach raw or lightly wilted. Baby and mature spinach can be used interchangeably in these recipes (yields may vary slightly); be sure to remove the tough stems from mature spinach before using.
  • Weights & Measures
  • 10 ounces trimmed mature spinach=about 10 cups raw
  • 10 ounces baby spinach=about 8 cups raw


PERSONAL NOTES

I used frozen spinach. But one thing I need to caution you on here is to make sure you've squeezed  out all the water from the spinach! I mean it. You'll end up with a watery souffle and it'll be disappointing.

Finally, I used Egg Beaters for the eggs. Cuts down a bit on cholesterol and some calories.

Bon appetit!

Thursday, January 10, 2013

Twice-Baked Acorn Squash with Quinoa and Gorgonzola

So far, my efforts to begin the new year eating more mindfully is a success. My goals didn't include anything ridiculously restrictive like, NO chocolate or NO sugar, blah, blah, blah. I simply wanted to eat healthier meals that I would enjoy. I don't believe in the idea of eating health food without considering too much how things taste.  If I can take off a few pounds in the process, even better.

What did I do? I began scouring my Pinterest boards for ideas.  Luckily, I'm addicted to Pinterest enough to have accumulated lots of ideas. Like this next dish...

TWICE-BAKED ACORN SQUASH WITH QUINOA AND GORGONZOLA


It's really tasty!  I will definitely be making this again, although I can't lie; it did some time from start to finish. But, when I have the time I will look forward to having it again.

The original recipe called for butternut squash and can be found here.

INGREDIENTS:


  • 1 large butternut squash
  • 1 tablespoon olive oil
  • 2 medium shallots
  • ½ cup quinoa
  • 1 cup water
  • ½ cup gorgonzola cheese, plus extra for topping
  • pinch of salt
(Serves 2)


DIRECTIONS:

  1. Preheat oven to 400˚. Slice acorn squash in half and scoop out seeds. Place each half cut side down in a 9×13 pan and pour ½” of water in the bottom. Place in oven and bake until tender, about 30-40 minutes. Once done, remove and set aside.
  2. Rinse quinoa and set aside. In a medium pan heat olive oil over medium low heat. Dice shallots, add to oil, and saute until shallots are fragrant. Stir in quinoa and water. Bring to a boil, then reduce to a simmer at let cook until water is absorbed, 12-15 minutes.
  3. While quinoa cooks, scoop out acorn squash, leaving a ¼”-1/2″ on the sides and bottom. Drain water from pan and return acorn squash to the pan, cut side up.
  4. Mash butternut squash and stir in gorgonzola cheese. Once quinoa is done, add it to the butternut squash. Taste and add salt if need be.
  5. Scoop filling evenly into butternut squash halves. Sprinkle with gorgonzola cheese and return to oven. Let bake for 10-15 minutes or until cheese has melted and the tops begin to brown. Remove from oven, cut eat half in half, and serve.
  6. Evenly spread filling back into butternut squash


PERSONAL NOTES:

I can't say I'd do anything different from the original recipe - I made no edits/additions to this. Something that did occur to me however, was that I don't typically go for gorgonzola cheese. It's not really my thing.  Used here, I have to say it was perfect. It wasn't too much or too little. It gave just enough of the right flavor. Bravo!

Friday, December 21, 2012

Penne with Vodka Sauce


Today's yummy dish is penne with vodka sauce. You might be thinking this is fairly ordinary fare, especially since I typically keep things kicked up a notch or two. But I chose the dish because I had the ingredients on hand from the lobster bisque I made the other day. This is what I made with the leftovers.

It really is an easy dish to make.  I went first to Allrecipes to find a recipe and found one here. It took only about 10-15 minutes to make, start to finish.

PENNE WITH VODKA SAUCE:


INGREDIENTS:

1 16OZ box of penne pasta
2 TBSP butter
1/3C vodka
1/2C heavy whipping cream
1 small can tomato paste
1/2C grated parmesan cheese
Salt to taste

DIRECTIONS:

Bring a large pot of lightly salted water to a boil. Add pasta and cook for 8 to 10 minutes or until al dente; drain.

Meanwhile, melt butter or margarine in a large skillet over medium heat. Stir in tomato sauce and cream. Add vodka and stir until it is reduced by half, about 4 to 5 minutes. Simmer uncovered for 10 to 12 minutes. Stir every few minutes. 

Stir in pasta, and heat through. Serve with Parmesan cheese.

PERSONAL NOTES:

I made some changes to the original recipe (which called for pancetta and tomato sauce instead of tomato paste). In addition, I used half and half instead of heavy whipping cream. I felt the tomato paste contributed to the thickness of the sauce. The salt was important though; I guess if you use pancetta it would be a little saltier, but I found I needed to add more than I would usually into the dish. But it was yummy - I will be making this again!

Monday, December 17, 2012

Lobster bisque


Well here's another winner to add to the recipe arsenal. Lobster bisque.

For Christmas my mother, who works at QVC, sent to me and my husband a box of lobster tails and filet mignon. While I don't eat meat, I DO eat fish. And boy, do I love lobster! So I decided to make a nice soup using the lobster.

I found the original recipe here from Allrecipes.com and I have to say it was easy; most definitely a keeper.

LOBSTER BISQUE:


INGREDIENTS:
1 cup chicken broth
2 medium slices onion
2 tablespoons butter
2 tablespoons all-purpose flour
2 cups milk
1/2 teaspoon salt
1 pound cooked and cubed lobster meat
1/2 teaspoon Worcestershire sauce
1 pinch ground cayenne pepper


DIRECTIONS:

In a small frying pan place 1/4 cup chicken broth and the onion. Cook over a low heat for 5 to 7 minutes.
In a medium size pot over medium heat melt the butter. Slowly whisk in flour. Whisk until a creamy mixture is created.Gradually pour in broth, whisking constantly. Whisk in milk, salt, onion, lobster meat, Worcestershire sauce and cayenne pepper. Heat until soup is almost boiling. Do not boil the soup as the milk will curdle when boiled.

PERSONAL NOTES:
Mostly I followed the recipe as written. A few changes I made included: using 1C half and half and 1C fat free half and half instead of using regular milk.  I also added garlic when cooking the onions (which I actually used shallots) and 2TBSP tomato paste - to give the soup a pinkish color. It was really yummy!!!


Oh - and I also added 3 small new potatoes. I left on the skin and chopped them into small cubes.  I baked them in the oven for about 15 minutes to soften them up for a little while. Then when adding the flour to the frying pan, I made sure the potatoes were in there first, then I added an additional TBSP flour to bring it up to 3 TBSP total.

I let it simmer for about another 20 minutes before eating.

Friday, December 14, 2012

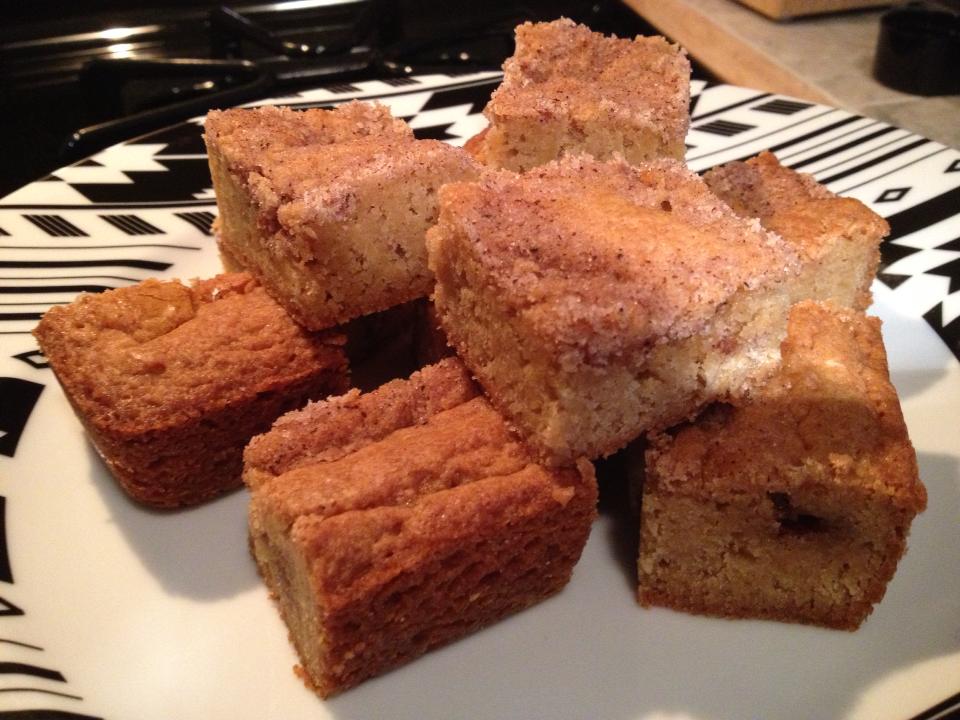
Cinnamon Swirl Blondies

So even though we're deep in the throes of the holiday season, I decided not to go the way I did last year baking RIDICULOUS amounts of cookies, etc. But that doesn't mean I'm not baking at all. I'm simply being more selective about my choices.

That said, I've been going through my Pinterest boards and came upon this one that I wanted to try out. It looked yummy and the recipe seemed easy enough. The outcome: It was and yes.

CINNAMON SWIRL BLONDIES


INGREDIENTS:

FOR THE BLONDIES:
2/3 cup unsalted butter (although if you prefer your blondies a little salty, use salted butter)
1 1/2 cups flour
1 teaspoon baking powder
1/2 teaspoon salt
1 cup packed brown sugar
1/2 cup granulated sugar
2 eggs
2 teaspoons vanilla
1 Tablespoon fresh lemon juice

FOR THE CINNAMON SWIRL:
1/4 cup butter (1/2 stick)
1/4 cup sugar
1/2 teaspoon cinnamon


DIRECTIONS:

Preheat the oven to 325 degrees. Grease an 8x8" baking pan. In a small saucepan, melt the 2/3 cup butter, and let it cook until it is golden brown. Set aside to cool slightly. In a small bowl, combine flour, baking powder, and salt. In a large bowl, combine the melted butter, brown sugar, and granulated sugar, and stir until smooth. Add the eggs, vanilla, and lemon juice and mix well. Add the dry ingredients and stir until just combined. Spread the batter in the prepared pan. In the same saucepan you used to melt the butter for the blondie batter, melt the 1/4 cup butter for the cinnamon swirl. Add the sugar and cinnamon and stir to combine. Drizzle the cinnamon sauce over the blondie batter and use a butter knife to swirl it in. Don't bother trying to do a fancy pattern; it just all melts together! Bake for 35 to 45 minutes, until a toothpick inserted in the center comes out with just a few crumbs on it. Cool completely before serving. 

PERSONAL NOTES:

I followed this recipe to the letter. It was easy to put together and it came out GREAT. These are really very much like brownies only with vanilla and gooey cinnamon swirls throughout. SO GOOD. I will definitely make these again (and probably bring up to the in-laws for Christmas :)

Sunday, September 2, 2012

Chocolate Pumpkin Cakes with Cream Cheese (Oreo) Frosting

My goodness, where has the summer gone??? Tomorrow is Labor Day, the unofficial end of the summer season. Boo! I'm sad. It's been a good few months.

My kitchen was completely overhauled. That took almost 2 months (my husband and I did it all ourselves - LOTS of work!). Then a few weeks ago my pc died. Just like that, in a flash. There goes all the pictures I was accumulating for new posts I was hoping to add to the blog. Eventually, when my husband fixes/rebuilds the pc I'll get those pics back. In the meantime, I've been building up a new library of photos for all the delectable dishes I made.

Yum.

That said, next up is a combination of recipes. 

Pumpkin Muffins.  Recipe can be found here.

Cream Cheese Icing. Recipe can be found here.


The good news is, this is really easy to make! Since the cake part itself is only 2 ingredients, you can't possibly mess it up. Seriously.  The originaly recipe calls for yellow cake mix with the canned pumpkin but what I did was use devil's food cake. You pretty much can't taste the pumpkin. So what are you left with? A yummy chocolate cake that is much lower in calories/fat than the regular boxed recipe. You're using no eggs, no oil. Pumpkin. It's healthier! Yay! 


If the frosting is cream cheese frosting, why does mine look like chocolate frosting? There's a very simple answer to that: I added a couple of Oreo cookies when mixing the icing. Sweet!


Oh, and what's that in the middle of the cupcake? That's right - it's a whole Oreo cookie. YUM!

So I supposed the "healthy" version of the cake didn't end up so completely healthy. Not with the added bonuses - but they are really yummy! I promise!

Monday, July 9, 2012

Avocado, Corn & Tomato Salad

What a yummy summer winner! I came across this recipe here and decided to give it a shot.

As it turns out, my kitchen is STILL under renovation (since, hell-o, MEMORIAL DAY weekend!!!). So cooking/baking anything is pretty tough.  Hence, I've been on a mission for two things. One: NO MORE TAKE-OUT. I swear, I've gained at least 6 pounds in the last 6 weeks.  And two: finding and making recipes that don't require any cooking.

This is how I turned to this current recipe.  And it is delicious! It only takes about 15 minutes to make (that includes the cooking time for the corn). I prepared everything else while the corn was cooking.  Then I soaked the corn in cold water for about 2 minutes before slicing it off.

Here it is...

AVOCADO, CORN & TOMATO SALAD


INGREDIENTS:

6 ears corn
3 large fresh tomatoes
1/2 large onion or about 1 cup chopped ( I used a sweet onion)
1/2 cup chopped fresh basil
two to three sprigs fresh oregano (optional)
2 tablespoons white vinegar ( I used white balsamic)
1/4 cup olive oil
coarse sea salt
fresh ground pepper

DIRECTIONS:

Boil corn in large pot of water for about 7 minutes. Drain and plunge corn into cool water. Cut corn off cob and set aside to cool completely.
Chunk tomatoes and onion. Coarsely chop basil and strip the oregano off stems. Place cooled corn, chopped vegetable and herbs into large bowl. Toss with vinegar and olive oil. Season to taste. Serve chilled or room temperature

Tips:
-The recipe called for white vinegar, but I love white balsamic (sweeter) vinegar. Apple cider vinegar would also work. I don't recommend regular balsamic vinegar. The dark red color will discolor the onion and corn and the overall look of the salad will change.


PERSONAL NOTES:

The original recipe calls for white balsamic vinegar.  That would certainly work.  I used a cabernet vinegar. So it was red, but as you can tell by my pictures it didn't turn the salad completely red.

It's so refreshing and simple to make!

Monday, June 25, 2012

Double Decker Oreo Fudge

Yes, I've been experimenting with fudge. Once I found out how ridiculously easy it was to make I've been putzing around with different ideas.  This one isn't exactly mine (original recipe can be found here) but I played around with it to bring you the following...

DOUBLE DECKER OREO FUDGE


INGREDIENTS:


  • 1 can of sweetened condensed milk, portioned in half
  • 10 Oreos, chopped
  • 1 cup white chocolate
  • 2 tablespoon butter
  • 1 cup of semi-sweet chocolate

  • DIRECTIONS:


    1. Split sweetened condensed milk in half and set aside. Chop Oreos and set aside
    2. Place white chocolate, one ½ of sweetened condensed milk, 2 tablespoon of butter in a heat proof bowl over simmering water. Stir and mix until melted and combined. Fold in Oreos and stir to combine. Pour mixture into pan.
    3. Place semi-sweet chocolate and remaining half sweetened condensed milk in a heat proof bowl over simmering water. Stir and mix until melted and combined. Pour mixture on top of Oreo layer and refrigerate for 1 an hour to set.
    4. Remove from refrigerator and peel away foil once set. For ease of cutting make sure to clean knife between cuts to prevent sticking.

    PERSONAL NOTES:

    As I've mentioned, these are ridiculously easy to make. That's actually a liability as I've eaten far too much of this lately. I really need to slow it down on the sugar!  Bad, bad... but oh so good...

    Friday, June 15, 2012

    Chocolate Caramel Macchiato Pie

    This is serious guys.  Chocolate. Caramel macchiato. Pie.  All rolled into one bit of fabulousness.

    Tomorrow is the Roaring 20's Lawn Party on Governor's Island.  This will be the first time attending.  For the last 5 years or so I was either working or in a yoga teacher training program.  This year I was determined to BE THERE.

    That said, my sister-in-law informed me of a pie contest at the event and encouraged me to register.  So I did.  Then the big question of which pie would I make arose.  I tried experimenting with a few different options, but I'm pretty sure this chocolate caramel macchiato pie is the one I'm going with.  It's YUMMY.  And...it's pretty much all my own creation.  Well - at least the combination of layers involved.  The recipes are all from different places - none I can truthfully say are all mine.

    I started with a sugar cookie layer, then espresso chocolate chip, then caramel, topped off with Oreo cookie truffle.

    Here it is...

    CHOCOLATE CARAMEL MACCHIATO PIE


    INGREDIENTS:

    For the sugar cookie layer:

    1 1/4 C flour
    1/2 tsp baking powder
    1/4 tsp salt
    1/2 C plus 2 TBLS margarine (I use butter sometimes)
    1 C granulated sugar
    1 Egg
    1 tsp vanilla extract

    For the espresso chocolate chip layer:

    1/2  stick butter, softened
    1/2 cup light brown sugar
    1 1/2 tablespoons granulated sugar
    1/2 of a large egg
    1 tsp vanilla extract
    3/4 cups all-purpose flour
    1/4 teaspoon baking powder
    1/4 teaspoon baking soda
    1/4 teaspoon salt
    1 tsn instant espresso coffee powder
    3/4 C semisweet chocolate chips

    For the caramel layer:

    25 caramel candies
    2 Tbls heavy cream

    For the Oreo cookie layer:

    1 package Oreo cookies
    1 8oz. package cream cheese, softened

    DIRECTIONS:

    For the sugar cookie mix:

    Combine flour, baking powder and salt then set aside.  Using a mixer, cream together margarine and 2 C sugar until fluffy.  Beat in eggs, one at a time, then the vanilla. Slowly beat in dry mixture.

    For the espresso chocolate chip mix:

    Cream the butter with the sugars using an electric mixer on medium speed until fluffy, approximately 30 seconds. Beat in the egg and the vanilla extract for another 30 seconds.

    In a mixing bowl, sift together the dry ingredients and beat into the butter mixture at low speed for about 15 seconds. Stir in the espresso coffee powder and chocolate chips.

    For the caramel layer:

    Place the caramel candies in a small saucepan over medium heat. Add the heavy cream and stir until completely melted. Pour hot caramel mixture over shortbread crust and spread into an even layer. Refrigerate until set, 30 minutes to 1 hour.

    For the Oreo cookie truffle layer:

    Using a blender or hand held mixer, mix Oreos and cream cheese together. 
    Preheat oven to 350 degrees.

    Place a layer of sugar cookie mix on bottom of 8x8 pan (or just use a pie pan).  Chill at least 30 minutes (or an hour) then layer on the espresso chocolate chip mix.  Bake for about 10-15 minutes (or until edges turn brown) and allow to cool for about 20 minutes. 

    Drizzle on the caramel and chill for about an hour.

    Top off pie with the Oreo cookie truffle mix and chill again for about an hour.  Serve and enjoy!

    PERSONAL NOTES:


    Oh my, are these just yummy!  Since I pretty much put all of these layers together myself I already included any important notes.  If you let the pie sit out for a few minutes before eating it will be a little softer.  Either way it is DELICIOUS! Plus, my husband gave it 2 thumbs up so it passed the test :)

    Keeping my fingers crossed it wins tomorrow!!!